Blogi loki päiväkirja
Dima's diary about anything
3D modelling, 3D printing, FPV, electronics, photography, life
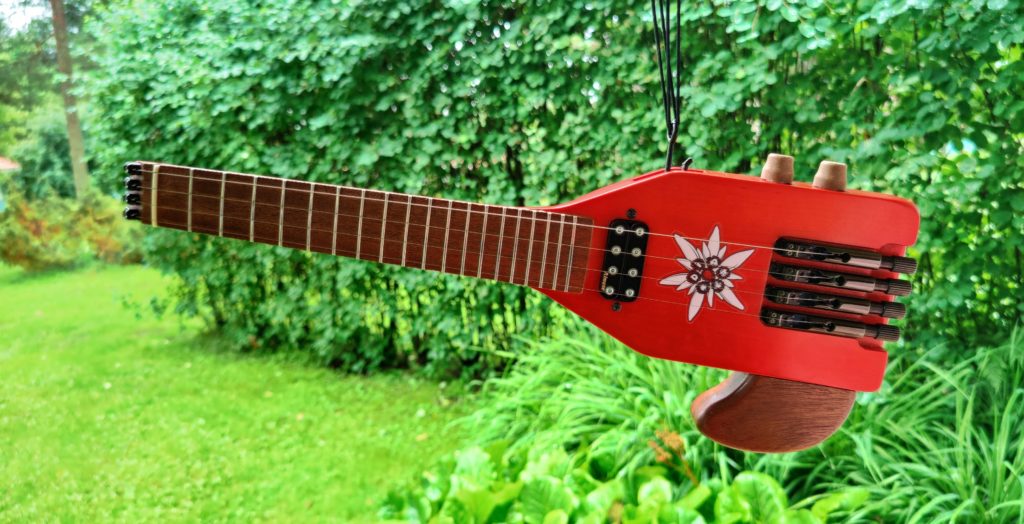
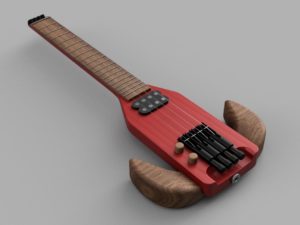
Deluke – headless electric ukulele

Brief
“Deluke” is a shortened name from DiA Electric Ukulele. It’s a unique left-handed headless concert-size ukulele designed by me for myself. Designed and built in 2020.
Specs:
- Body: Birch wood
- Fretboard: Rosewood
- Length: 48 cm
- Width: 12 cm
- 13,5 cm with knobs
- 19 cm with the detachable support
- Body thickness: 3,2 cm
- Neck thickness: 2 cm
- Stings: Steel (G wound)
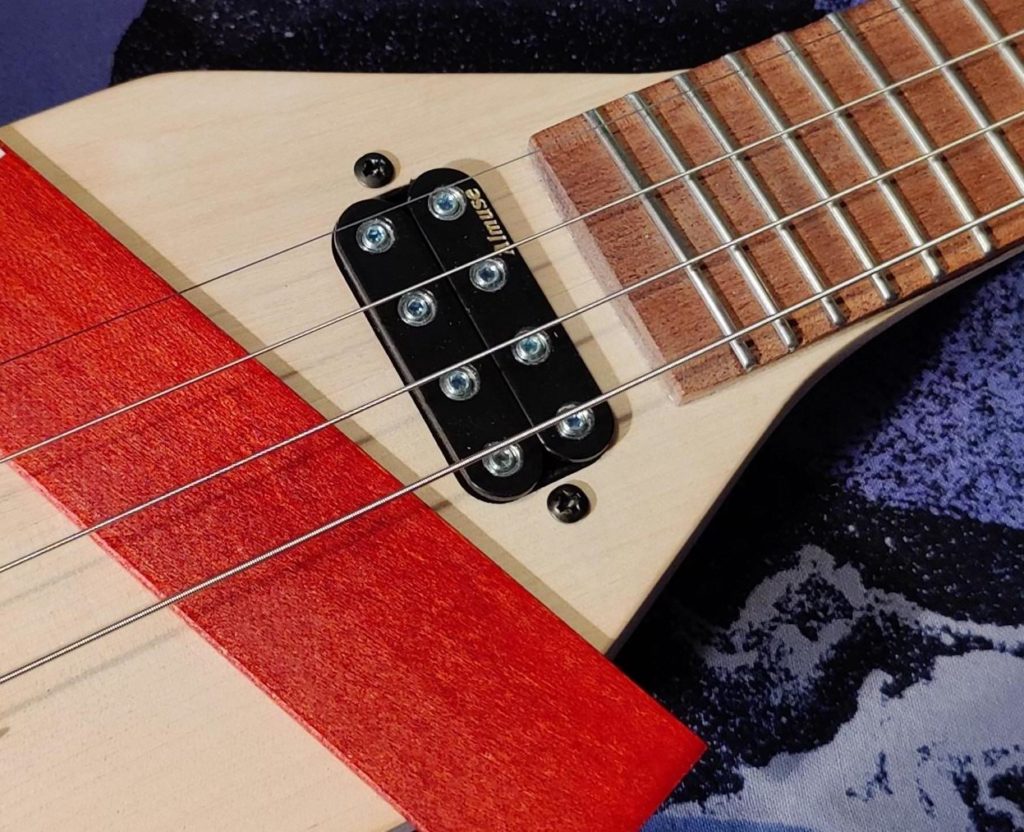
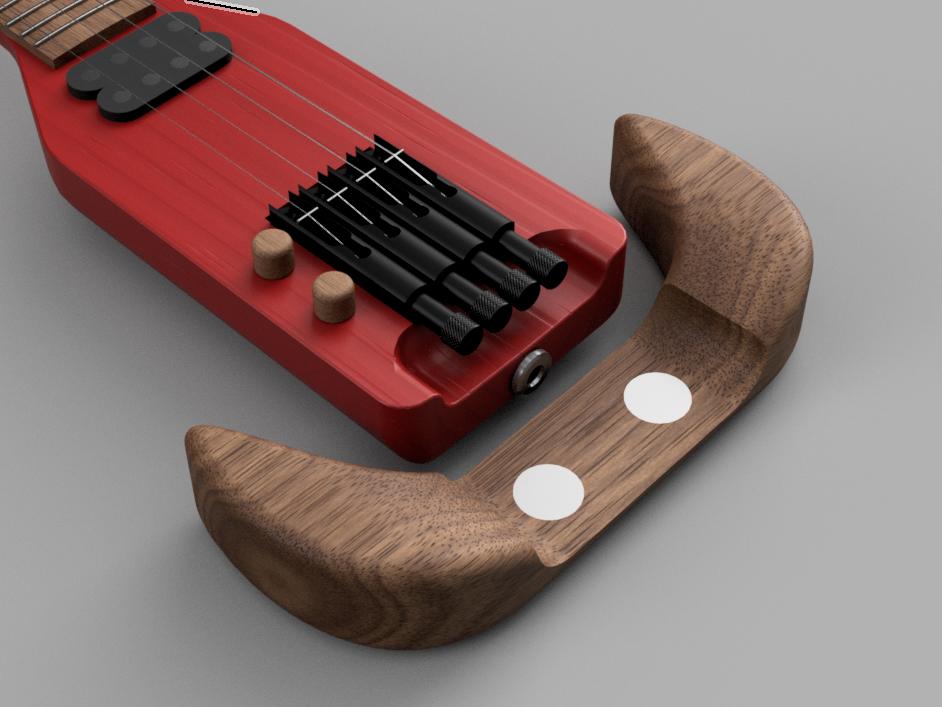
- Pickup: Almuse humbucker
- Bridge: ABM single fine tuner bridges
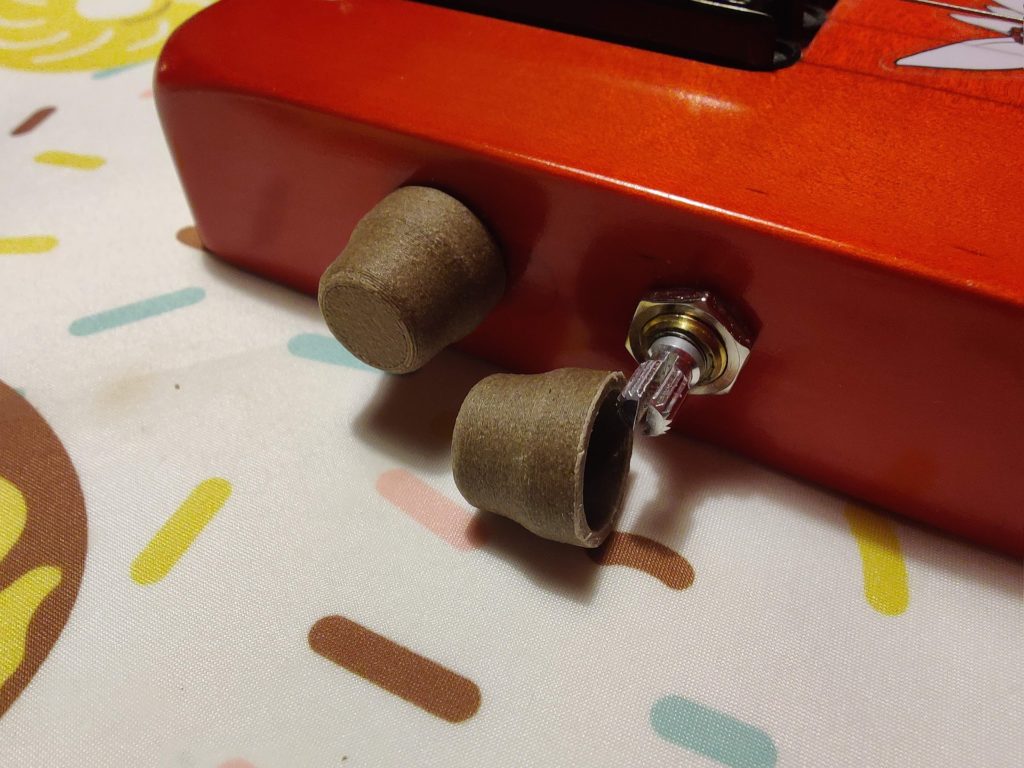
- Volume: 500k logarithmic potentiometer
- Tone: 500k logarithmic potentiometer and 22nF capacitor
Idea
I’ve been struggling to learn how to play the guitar. For me it’s a large instrument with narrow string spaces, making it difficult to handle, and its portability doesn’t suit my preferences. Yes, those have been my excuses 😅. For years, I’ve been into playing jaw harps and playing with loopers and beatboxing, but lately, I’ve been craving the ability to play melodies. However, I was still hesitant to try my hand at the guitar. Then, the idea of trying a ukulele popped into my mind.
I decided to purchase my first concert-sized ukulele with a piezo pickup, and while it wasn’t quite love at first sight, it didn’t take long for me to appreciate its charm and convenience compared to the guitar. The ukulele’s compact size and ease of play quickly won me over, making it an enjoyable instrument to pick up and practice. Sometimes, there were occasions when I wished to play, but I had to keep things quiet, especially when my little one was sleeping. I started thinking about solid body electric ukulele.
Unfortunately, my search for left-handed and compact electric ukuleles proved futile, as there were none in the market. That’s when I considered the idea of building one myself. In the past, I used to have a wood workshop, which allowed me to indulge in various creative projects. However, after I no longer had access to the workshop, I realized that seeking help from a skilled luthier was the best way forward. Excited about the possibility, I began planning what kind of electric ukulele I envision.
I set out on a quest to find the perfect electric ukulele that would meet two main guidelines: a concert size for its comfortable playability, and a good compromise between compactness and playability. In my search, I stumbled upon headless guitars and was fascinated by their innovative design solutions. This led me to the decision that my ideal ukulele should also be headless.
The concert size was a natural choice for me since it strikes a balance between the smaller soprano and the larger tenor ukuleles. Its size ensures that it’s not too cumbersome while still offering a warm and rich tone.
The idea of a headless ukulele appealed to me for several reasons. First, it adds to the overall compactness, making the instrument easier to carry and handle. Second, it eliminates the need for tuning machines on the headstock, reducing weight and further contributing to its portability. Lastly, headless designs often utilize other tuning mechanisms that are more precise and require less maintenance, ensuring stable and reliable tuning.
Body
I have a bit of an obsession with birch. Not only is it a beautiful wood, but it also holds a special significance as the Finnish national tree. Its hardwood properties make it an obvious choice for the main body. The rich and distinctive grain patterns of the birch undoubtedly adds to the instrument’s visual appeal and uniqueness. For the fretboard, I’ve opted for the classic choice of rosewood.
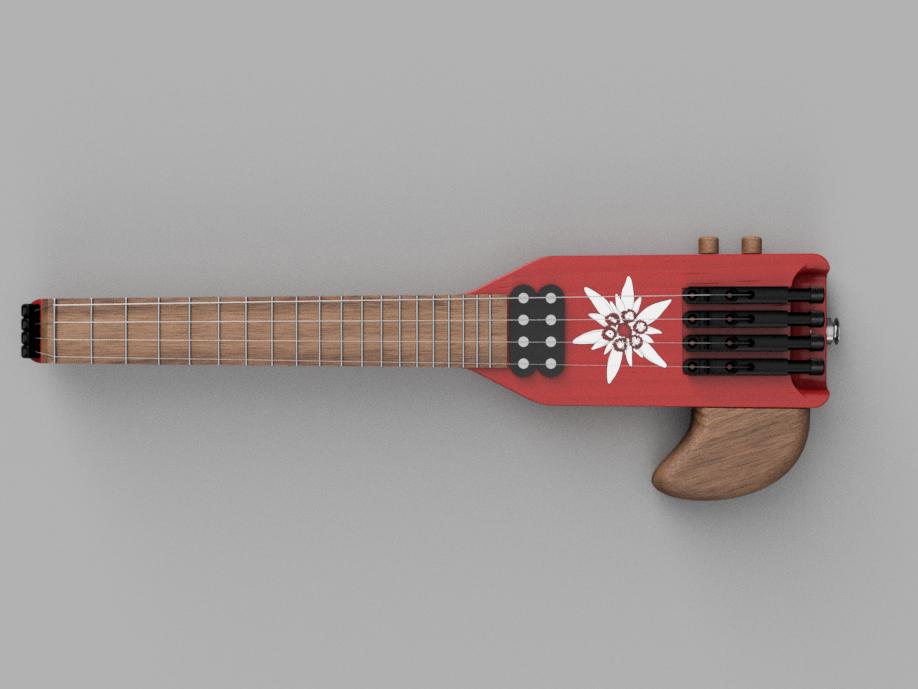
The ukulele’s body is coated with nitrocellulose varnish in a captivating cherry red colour. The fretboard is kept in its natural colour.
Pickups
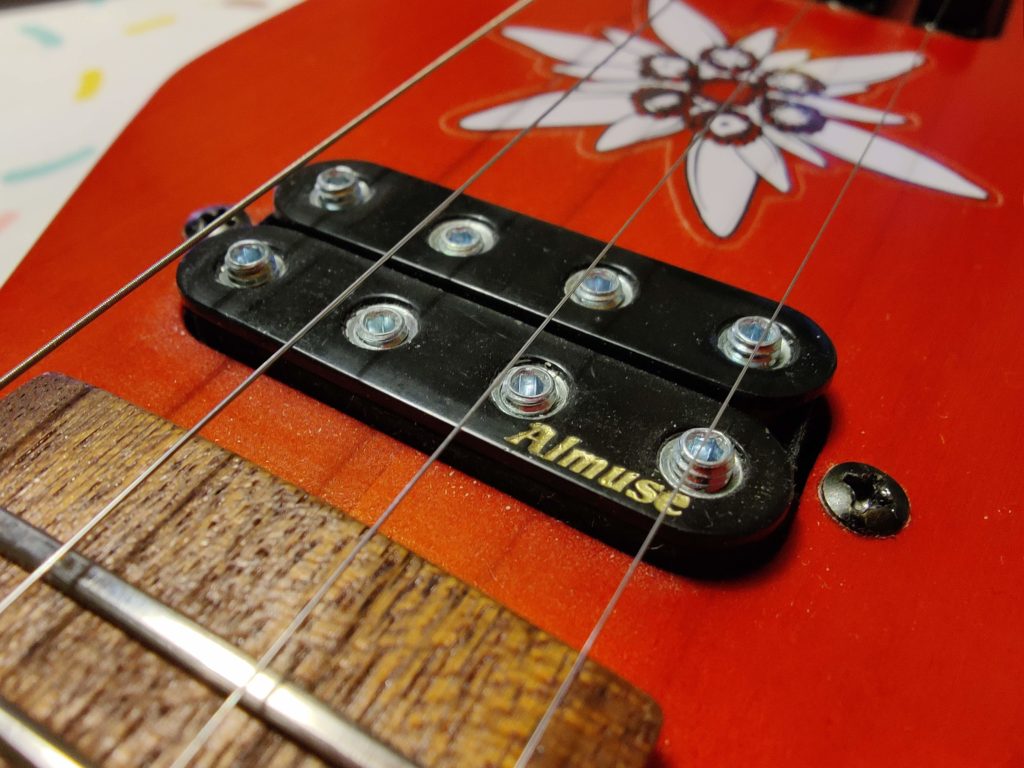
After much consideration, I decided to explore using bass pickups with different features, such as blade magnets, due to their versatility in accommodating various string spacings. However, I came across a British maker called Almuse that specialized in custom pickups mostly for mandolins but also for ukuleles. I ended up purchasing their “classic” humbucker pickup for the neck position. My plan was to build a single pickup version for a more minimalist setup. I believed this would suffice for my needs, as I didn’t anticipate playing rock-style music that required punchy tones with a bridge pickup.
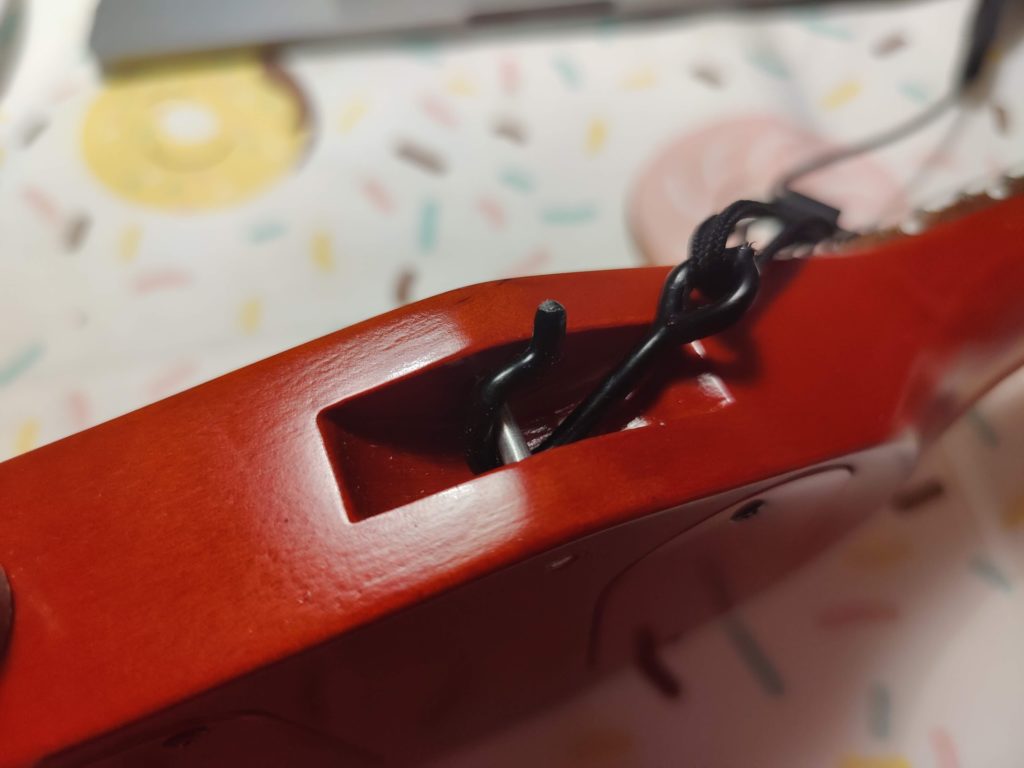
Headless bridge
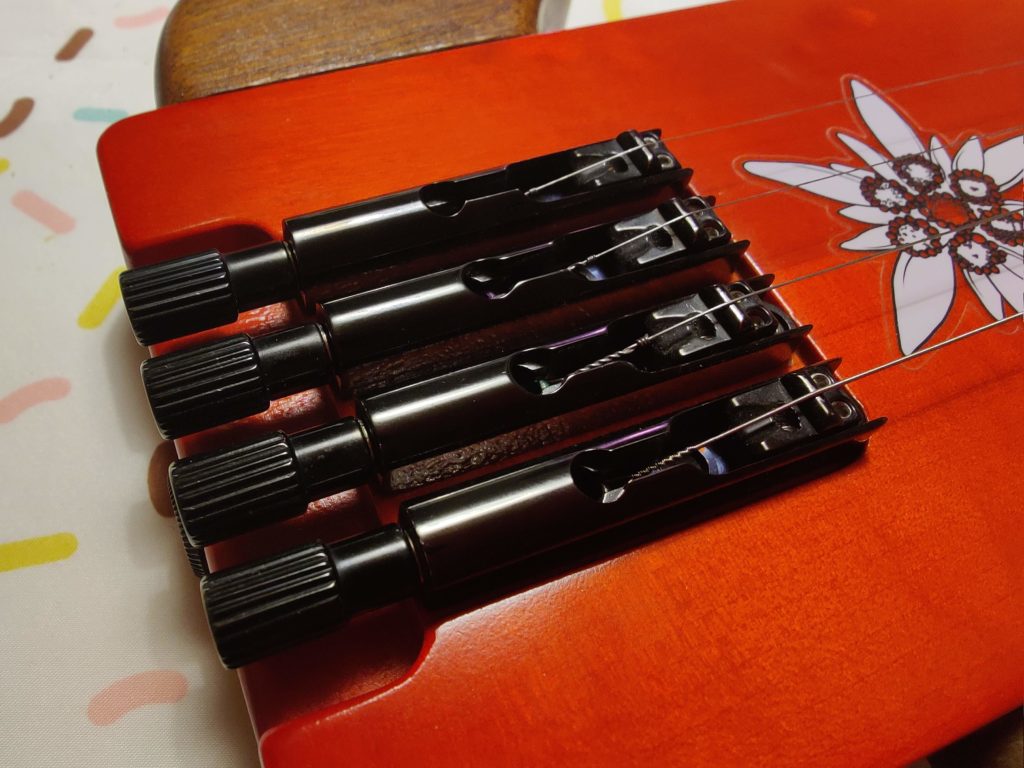
I searched for bridges with integrated tuners for my ukulele, but all the options I came across were designed for guitars and basses, which didn’t fit the ukulele’s string spacing. However, I was fortunate enough to discover ABM’s single tuner bridges originally made for guitars. This meant I could position them at a distance that suited my ukulele perfectly. How awesome!
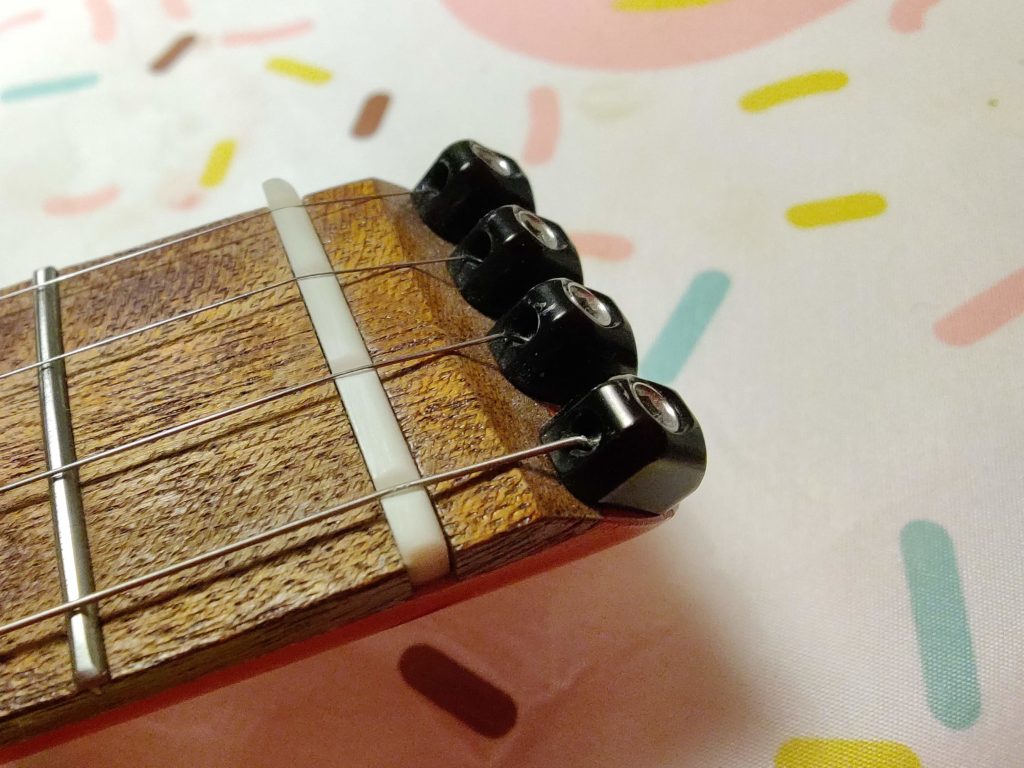
And of course, they had headpieces available as well! So, I didn’t have to design custom locking systems for the strings, as the ABM‘s headpieces made my plans much easier.
Strings
Finding steel strings specifically designed for low G ukuleles proved to be quite challenging. Most options available were ready sets for high G versions, leaving limited choices for my instrument. In my quest for suitable strings, I turned to various ukulele forums, hoping to find some useful discussions, but unfortunately, the consensus was inconclusive.
Not willing to give up, I changed my approach and decided to research extensively on string gauges for electric guitars. To my delight, I discovered a wealth of information on this topic. It became apparent that string preferences are highly individual and vary depending on one’s playing style and personal taste. Armed with this newfound knowledge, I’m now better equipped to make an informed decision on which strings will work best for my low G ukulele.
Indeed, when it comes to electric guitars, there is a vast array of string set variations available. Generally, thicker strings tend to produce better tones, providing a rich and robust sound. However, it’s essential to consider the trade-off, as thicker strings can make playability more challenging.
For those primarily focused on strumming rhythmics, opting for thicker strings might be a suitable choice, as it enhances the resonance and depth of the chords. On the other hand, if you prefer a finger-picking style with bending techniques, thinner strings offer a more responsive and comfortable playing experience.
Moreover, the scale length of the guitar also plays a crucial role. The scale length influences the tension of the strings and affects how tightly you need to tune them. Different scale lengths can impact the feel and responsiveness of the strings, and finding the right balance is vital to achieving the desired playability and tone for your playing style.
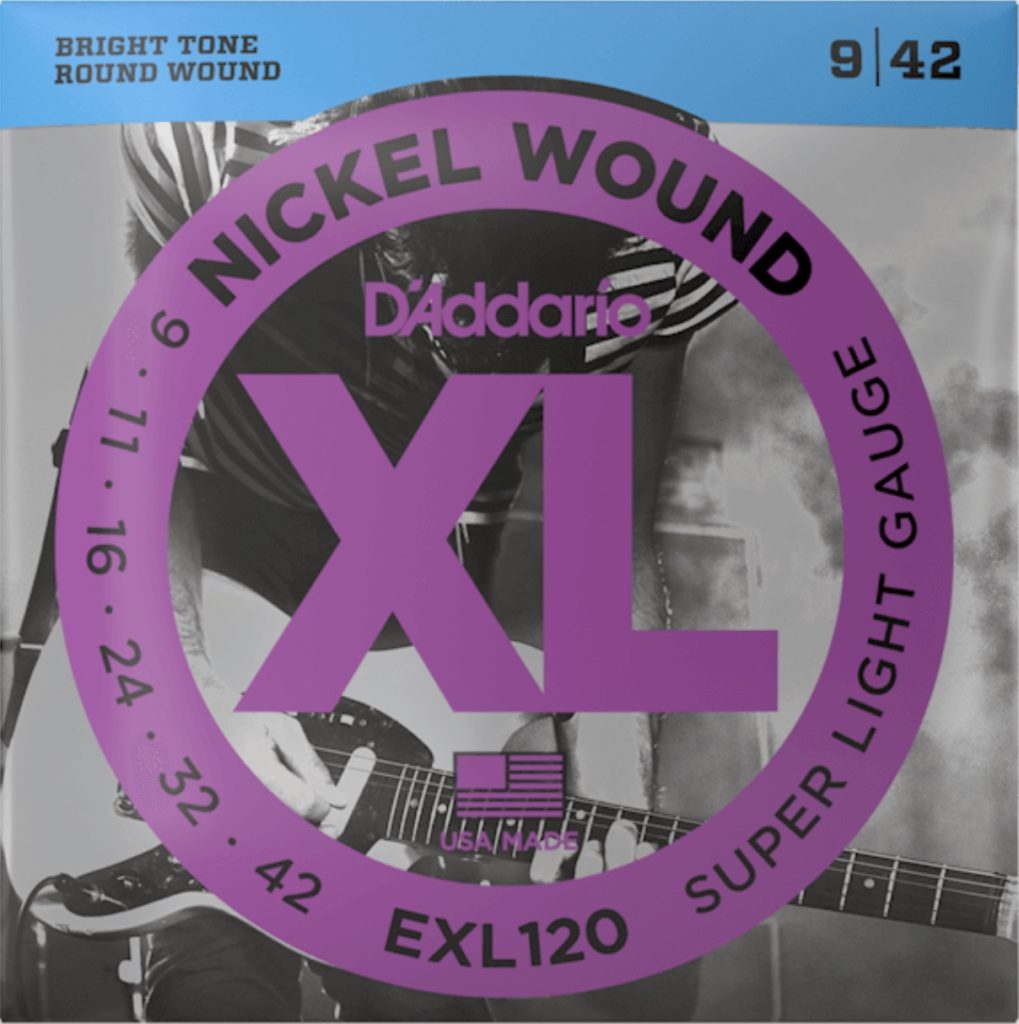
After careful consideration, I settled on the D’Addario EXL120 Super Light 9-42 set as my starter pack. This set offers three different options to try out: 9-24, 11-32, and 16-42. Since the ukulele has a significantly shorter scale compared to a guitar, I anticipated that thicker strings on the ukulele would offer a similar feel to using thinner strings on a guitar.
I began my experimentation with the 11-32 option to see how it would perform in practice. However, I quickly found the wound 3rd (C) string to be a bit annoying, which prompted me to switch to the 9-24 option, where only 4th (G) string is wound. This change significantly improved the overall playing experience, and I decided to stick with these strings for now.
Electronics
As I’m using a double coil humbucker pickup, I needed to pair it with 500k potentiometers. This led me to conduct further research on whether to choose logarithmic or linear options for these potentiometers.
In a nutshell, the linear option provides a sharp volume cut, which can limit the adjustment range on the quieter side. Conversely, the logarithmic option offers a better adjustment range on the quieter end, making it more suitable for my preferences. Consequently, I decided to go with the logarithmic potentiometers.
The effect on tone adjustment is similar. The linear potentiometer provides better precision on the higher end but drops quickly after the halfway point. On the other hand, the logarithmic option allows for faster tone adjustment on the high side, slowing down on the low end. This makes it more convenient to utilize the full range of tone adjustments, aligning with my needs, and I opted for logarithmic potentiometers in this regard as well.
For tone adjustment, capacitors come into play. The size of the capacitors affects the tone range at the high end. A bigger cap value results in a larger range. For instance, a 1nF capacitor influences the highest end, affecting picking sounds or high hisses. Combining this with a linear potentiometer allows for precise adjustment of those sounds while maintaining a mostly natural tone. A 22nF capacitor affects the high range and has a discernible impact on the tone. Increasing the cap value to 47nF, the tone adjustment begins to influence the mid-range.
Curiosity got the better of me, so I bought all three capacitor values to experiment. However, after trying them out, I believe that the 22nF capacitor aligns best with my desired tone and preferences. Therefore, I decided to stick with the 22nF capacitor for my setup.
Luthier
As I mentioned before, due to the absence of my own wood workshop, I had to seek out a luthier to collaborate with. I reached out to my musician friends for recommendations, hoping to find someone skilled in the craft. To my surprise, a local luthier named Aaron Soitin was highly recommended right here in my city. I decided to pay him a visit to discuss my ukulele project.
During our meeting, Aaron and I spent a good two hours conversing about the project. He had already crafted numerous acoustic and electric ukuleles, which impressed me greatly. His expertise and enthusiasm for the craft made me confident that he was the perfect person to collaborate with.
Design progress
This was my initial impression of the ukulele: The slender body has knobs located on the front.
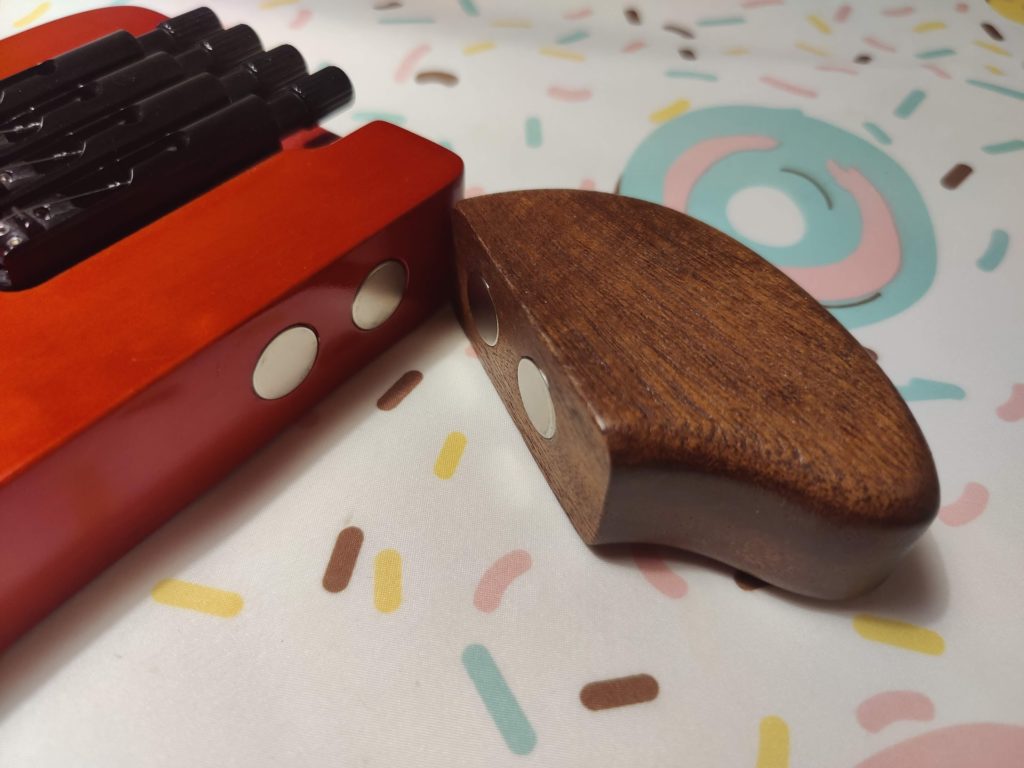
Furthermore, I considered the possibility of incorporating additional support to enable playing without a strap. I devised a detachable support that securely attaches to the back of the ukulele using strong magnets. The external dimensions of this support match those of a concert ukulele. As I play my acoustic ukulele, I observe that it naturally rests on my leg with its back portion, and my hand finds support on the upper back part. This led me to believe that such support would suffice.
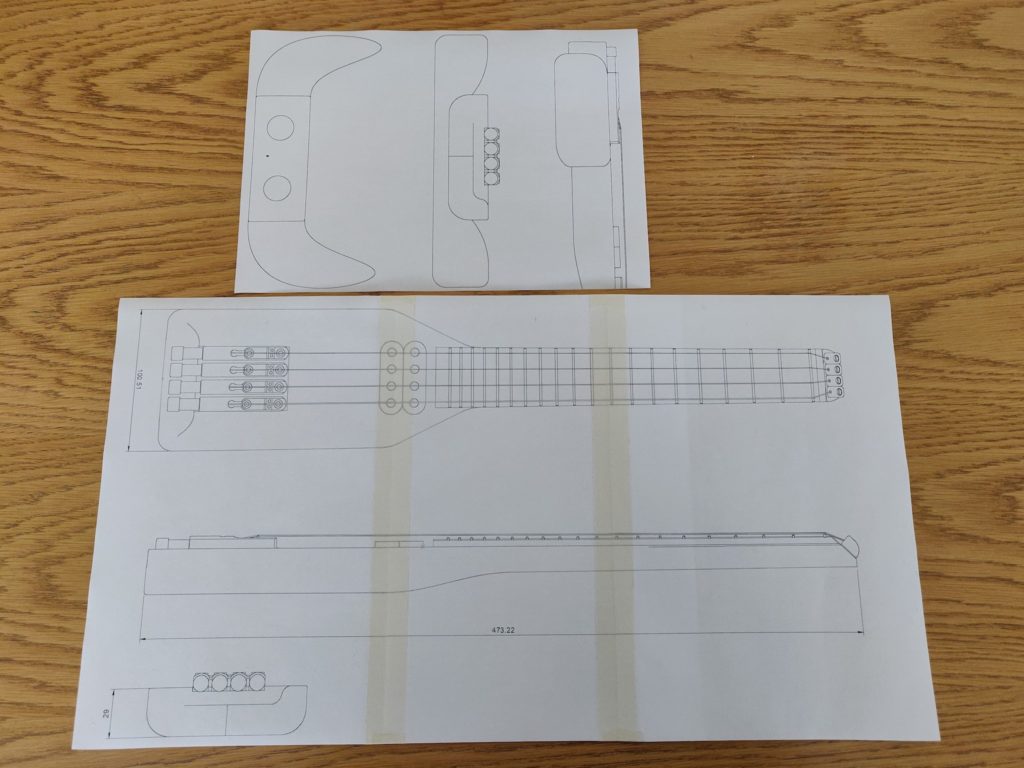
Aaro contacted me, requesting 1:1 drawings. He intends to create a cardboard prototype to evaluate how the ukulele feels when held in hand. I printed a few copies of these life-size drawings for both the ukulele and its support. Since I lack a large printer, I had to tape three sheets together. Nonetheless, it was quite fascinating to witness the true-to-life scale of the ukulele in my hands.
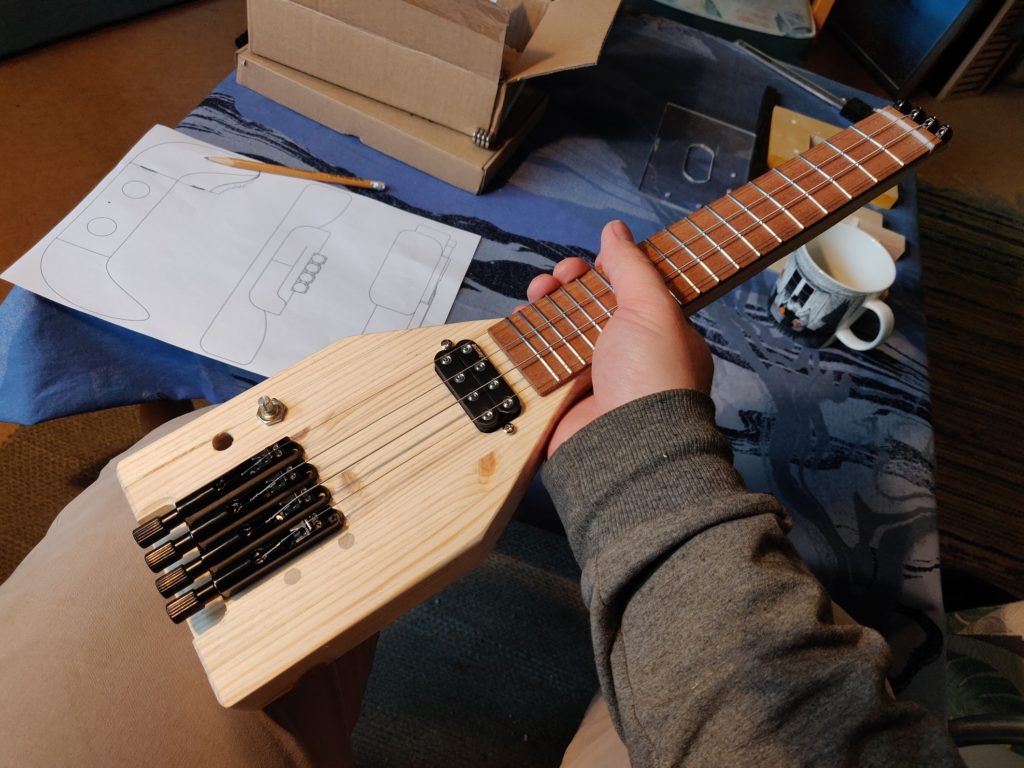
When the luthier created the prototype, there was an unexpected issue: the body turned out to be wider than originally planned. This was due to the potentiometers requiring more space to be positioned near the bridge.
After much contemplation and internal struggle, I finally confronted an idea that I had been avoiding from the start. Since I still desired a narrower body for the ukulele, the current prototype didn’t entirely meet my satisfaction. Thus, I decided to give the avoided option a chance, which involved placing the potentiometers on the side of the instrument.
Aaro took measurements and informed me that the body could be reduced by over a centimetre from the original plan. This sounded promising. Consequently, I proceeded to update my 3D model to accommodate these changes.
As realized that I don’t actually need support on top since my hand naturally rests over the bridge, I revised the concept of the detachable support. The magnets are placed on the opposite side and made a smaller portion of the support.

After conducting the experiment with the updated design, we discovered that it was slightly too narrow to accommodate the potentiometers properly. Therefore, I made a small adjustment by adding just a bit of width to the body. This alteration proved to be crucial, as it led us to achieve the final result we were aiming for. Moreover, with these adjustments, the ukulele’s appearance began to take on a well-balanced and aesthetically pleasing look to the eyes!
Indeed, you might have noticed the white flower on the ukulele. This was an idea that had been lingering in my mind for quite some time, and this project provided the perfect opportunity to bring it to life. As much as I wanted to draw it myself, I found that I lacked the necessary artistic skills. Therefore, I decided to seek the expertise of an Indonesian artist named Gazacreative on Fiverr. With his talent and creativity, he was able to visualize my thoughts. The result was printed on transparent stickers and stuck to the body, and I was very pleased with the outcome.
Is it for sale? It’s really amazing id like to have one of this
Unfortunately, it’s not for sale. I designed it for myself.
I will be curious to hear the sound do you have a video ? tanks