
This guide focuses on using the M-Vave Chocolate Plus MIDI controller with Chaos Audio Stratus smart pedal. This article utilizes the Stratus MIDI implementation chart (updated March 26, 2025) and Chocolate Plus firmware version 2025_06_18. While based on these specific versions, the core concepts explained here should remain applicable to future releases.
Update 28.2.2026
Chaos Audio has released a new update for the Stratus pedal, introducing a built-in Tuner function. The Tuner can be toggled via MIDI using CC 18 with a value of 3. Note that this command is not yet listed in Chaos Audio’s official MIDI implementation table, but it is fully functional in the latest firmware.
I've added it to the table and the guide below.
Update FCP
In this guide, I will refer to the Chocolate Plus as FCP (FootCtrlPedal), as this is the device name displayed within the configuration apps.
Before proceeding, ensure your FCP is running the latest firmware.
- Visit the M-Vave download page to download the latest software and firmware files.
- Use the SincoOTA app (available for mobile and desktop) to perform the upgrade.
- You can also find an official video tutorial on the download page to walk you through the update process.
MIDI Setup and Control Logic
The current MIDI implementation chart for the Stratus is available on the Chaos Audio website. Using that data, I have organized the Stratus functions into five distinct Groups.
Navigating Groups
You can cycle through your groups in a loop:
- Next Group: Press C + D simultaneously to move forward (e.g., from Group 4 to 5, or Group 5 back to 1).
- Previous Group: Press A + B simultaneously to move backward.
Understanding the Display
The FCP display provides real-time feedback on your current status:
- Numbers (01–05): Indicate the currently active Group.
- Suffix Letter: Indicates the last button pressed (e.g.,
01a means you are in Group 1 and last pressed button A).
Function Organization
The table below outlines how I have mapped the Stratus functions. Each function includes its corresponding MIDI parameters for your reference during setup.
| Button A | Button B | Button C | Button D | |
|---|---|---|---|---|
| Group 1: Mode selection | Looper CC 18 0 | Stompbox CC 18 1 | Preset CC 18 2 | Tuner CC 18 3 |
| Group 2: Looper control | Press down: record CC 17 1 | Press down: play CC 17 2 | Press down: ovedub CC 17 3 | Short press: pause CC 17 4 Long press: clear CC 17 0 |
| Group 3: Stompbox | Toggle 1. pedal CC 16 0 | Toggle 2. pedal CC 16 1 | Toggle 3. pedal CC 16 2 | Toggle 4. pedal CC 16 3 |
| Group 4: Preset selection | Select 1. preset PC 0 | Select 2. preset PC 1 | Select 3. preset PC 2 | Select 4. preset PC 3 |
| Group 5: Volume | Mute CC 7 0 | 15% CC 7 19 | 65% CC 7 82 | 100% CC 7 127 |
Navigating Modes and Groups
The FCP is programmed to follow the internal logic of the Stratus. Because certain MIDI commands only work when the Stratus is in a specific mode, you must sync your FCP group with the pedal’s current state.
1. Setting the Mode (Group 1)
Use Group 1 to define the mode of the Stratus.
- Button B: Sets Stratus to Stompbox Mode.
- Once set, switch the FCP to Group 3 to toggle your first four pedals (Buttons A–D).
- To change presets, switch to Group 4. Selecting a preset here will automatically update the pedals in your chain.
2. Using the Looper (Group 2)
To use the Looper, you must first ensure the Stratus is in Looper Mode (via Group 1).
- Switch the FCP to Group 2.
- Buttons A, B, C, and D now act as your dedicated looper controls (Record, Play, Stop, etc.).
- Note: Group 2 commands will only function when the Stratus is in Looper Mode.
3. Volume and Utility (Group 5)
Group 5 provides volume control across all modes.
- Button A: Mute
- Button B: 15% Volume
- Button C: 65% Volume
- Button D: 100% (Full) Volume
Pro Tip: If you have an external Expression Pedal connected to the FCP, you can map it to control Volume via MIDI CC. This allows you to adjust volume at any time without having to switch to Group 5.
Known Issue: LED Feedback in Preset Mode
Please note that while the Stratus is in Preset Mode, the physical LEDs on the pedal may not update visually when you trigger preset changes via the FCP. Although the presets are changing successfully, the LED indicators do not currently reflect the selection.
This appears to be a minor firmware synchronization issue. I have reached out for further information and will update this guide once a fix or explanation is provided.
Configuring the Stratus
For this guide, we will use MIDI Channel 1. If your rig requires a different channel, you can adjust these steps accordingly.
- Connect your Stratus to the Chaos Audio app.
- Navigate to Settings and select MIDI Setup.
- Tap Channel 1 from the list.
- Note: You may encounter a minor UI glitch where the checkmark blinks and then disappears.
- To verify the selection: Exit the menu and reopen the MIDI list. Ensure the checkmark is now solidly visible next to Channel 1.
Once the channel is confirmed, the Stratus is ready to receive commands.
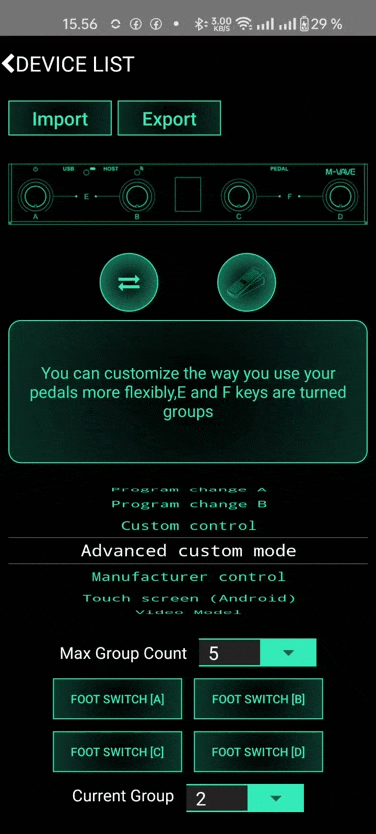
Hardware Connections and Interface
To get started, it is important to understand the physical ports and the mode switch on the back of the FCP.
The U-O-H Switch
This 3-position switch determines how the FCP communicates:
- O (Off): The device is powered down.
- U (USB Mode): Use this for connecting to a computer. The ”USB” port acts as a MIDI interface for your PC/Mac. You can use this mode to update firmware or change settings via desktop software.
- Note: The ”HOST” port is disabled in this mode, but it provide power.
- H (HOST Mode): This is the mode required for the Stratus. The ”HOST” port now sends MIDI data and provides power to connected devices. You can still use Bluetooth to adjust FCP settings on your phone while in this mode.
Port Guide
- USB (USB-C): Connect your power source here (5V phone charger, power bank, or computer).
- HOST (USB-A): This port sends MIDI commands and provides power to the pedal.
- PEDAL (3.5mm): A TRS port for connecting an external expression pedal.
- BLUETOOTH: Always active. Pair with your phone or computer to setup FCP or use it as MIDI or keyboard device.
Final Setup Steps
- Connect the Stratus: Plug a USB data cable from the Stratus to the FCP’s HOST port.
- Crucial: Ensure your cable is a data cable, not just a ”charging only” cable.
- Power the FCP: Plug a 5V power source into the FCP’s USB port.
- Switch to Host mode: Slide the switch to the H position.
- The FCP will now power the Stratus via the Host port. You do not need a separate 9V power supply for the Stratus in this configuration!
Programming the FCP
The moment you’ve been waiting for! To program the FCP, we will use M-Vave’s CubeSuite app.
We are using M-Vave’s CubeSuite app for programming FCP. You can it find on Google Play: CubeSuite or dowload from M-Vave’s download section. For PC or Mac open ”PC Software” tab and for mobile app look for ”Mobile APP” tab.
If you are using PC app, you have to put FCP in ”U” mode. And you can’t live test Stratus at the same time. If you are using mobile app wirelessly, FCP is in ”H” mode and you can test your settings immediately on Stratus while tinkering in CubeSuite.
Take a note, that FCP can be connected to both. CubeSuite on the computer via usb and to the same app on the phone via bluetooth. And you can change settings from the both app at the same time. This might cause some mess. Better to chose one method.
Interfaces in both APP are quite identical. On PC you see everything in one glance, but in mobile app you are using three screens. There’s one bigger difference. In mobile app expression pedal can be set by clicking Expression pedal -icon on the main screen. In PC app it’s the ”Interface”-button on top and make sure the interface type is set to Expression Pedal.
Where to Download
- Mobile (Recommended): Available on Google Play or download from ”Mobile app” tab on the FCP donwload page.
- PC/Mac: Download from the ”PC Software” tab on the FCP download page.
PC vs. Mobile: Which should you use?
You can use either, but the workflow differs:
- Mobile App (Wireless): Keep the FCP switch in H (Host) mode. This is the best method for ”tinkering,” as you can test your MIDI commands on the Stratus immediately after saving them in the app.
- PC App (Wired): You must set the switch to U (USB mode) to connect. Note that in this mode, the FCP cannot send commands to the Stratus, so you won’t be able to ”live test” your settings.
⚠️ A Note on Syncing: The FCP can technically connect to the PC via USB and the mobile app via Bluetooth simultaneously. Changing settings in both apps at once can cause synchronization errors or ”messy” data. I strongly recommend choosing one method and sticking to it for your session.
Interface Differences
While the logic is the same in both versions, the layout varies:
- PC App: Everything is visible on one screen for a fast overview. To configure an expression pedal, click the ”Interface” button at the top and ensure the type is set to Expression Pedal.
- Mobile App: Settings are spread across three screens. To configure your expression pedal, tap the Expression Pedal icon located on the main home screen.
Win/Mac app
Mobile app
Connecting via Bluetooth
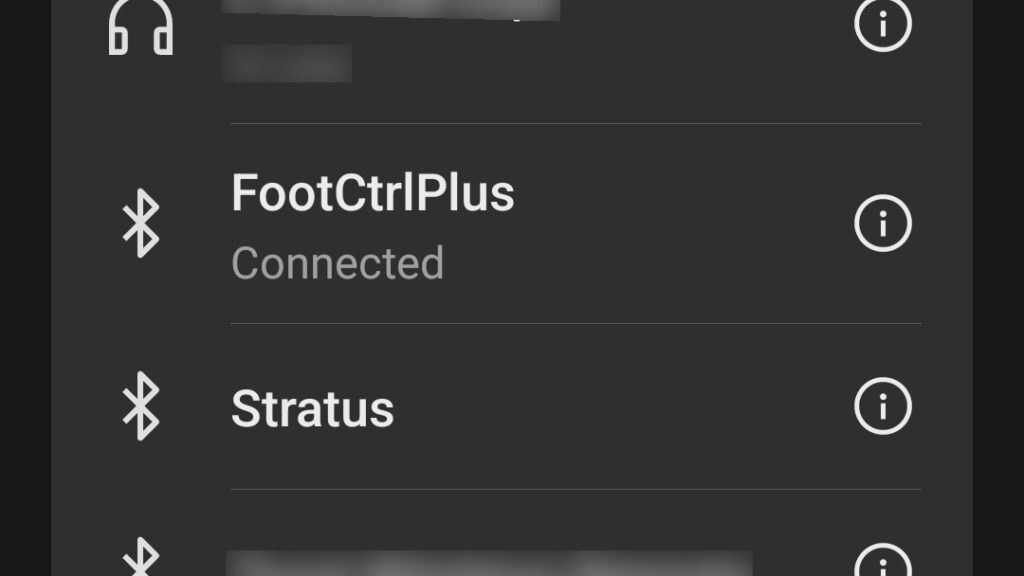
Once your hardware is powered on, follow these steps to pair the FCP with your mobile device:
- Enter Pairing Mode: Turn on the FCP. If the blue LED is blinking, the device is in pairing mode.
- Pair Your Device: Open your phone’s Bluetooth settings, just as you would when connecting a speaker or headphones. Look for ”FootCtrlPlus” in the list of available devices and select it.
- Open CubeSuite: Once paired, launch the CubeSuite app. The app will automatically scan for your device.
- Final Connection: When the ”FootCtrlPlus” box appears on your screen, tap it to enter the programming interface.
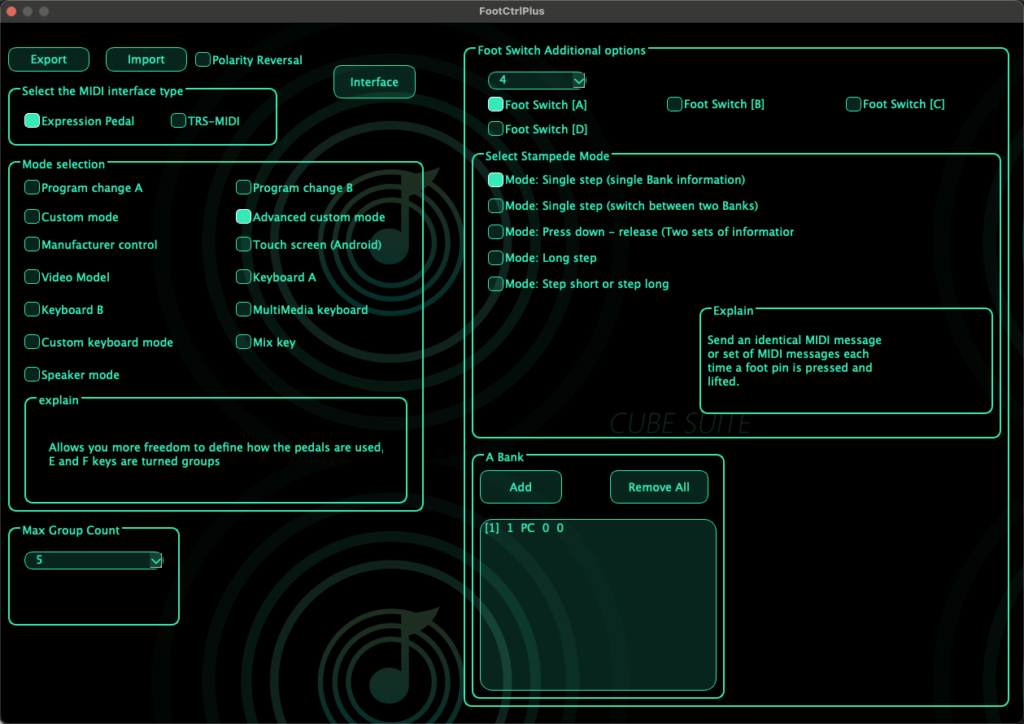
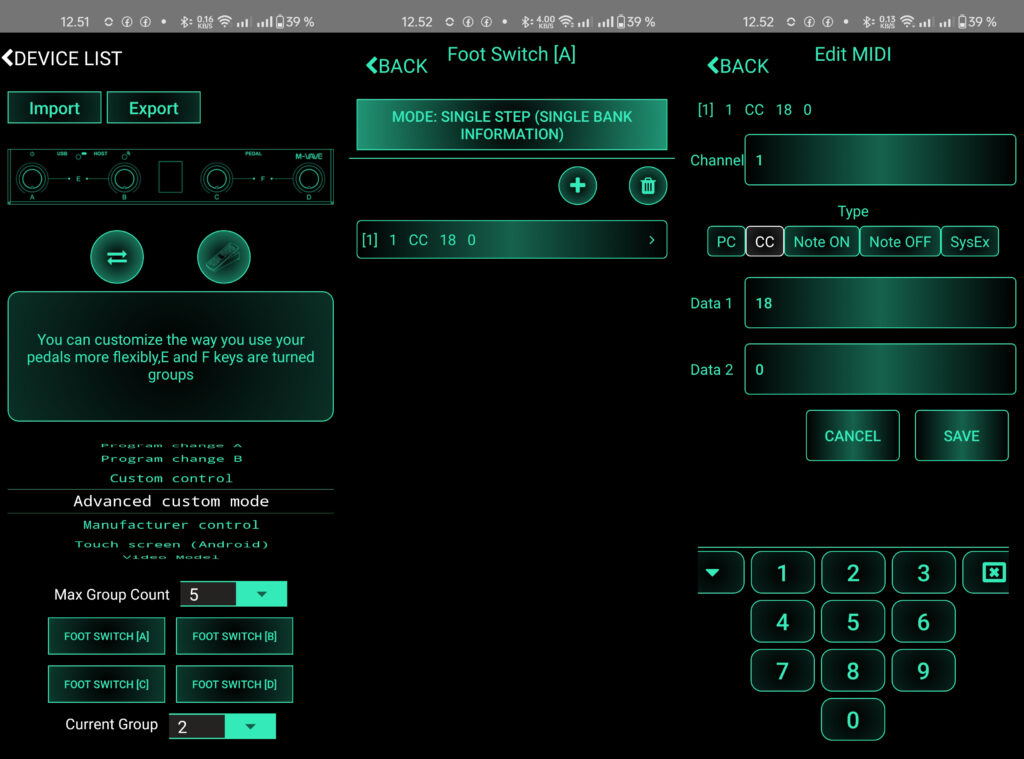
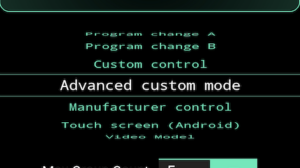
To get the most out of the FCP and Stratus, we will be using Advanced Custom Mode.
Configuring Groups
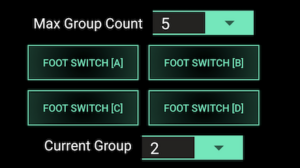
Before we begin mapping individual buttons, we need to define how many ”banks” or groups we want to use.
- Set Max Group Count: Within the settings, set the Max Group Count to 5.
- Note: If you do not plan on using the dedicated volume controls in Group 5, you can set this to 4.
- Synchronized Selection: When you select current group number in the app, the FCP hardware will update its display to match (e.g.,
01,02, etc.).
Group 1: Mode Selection
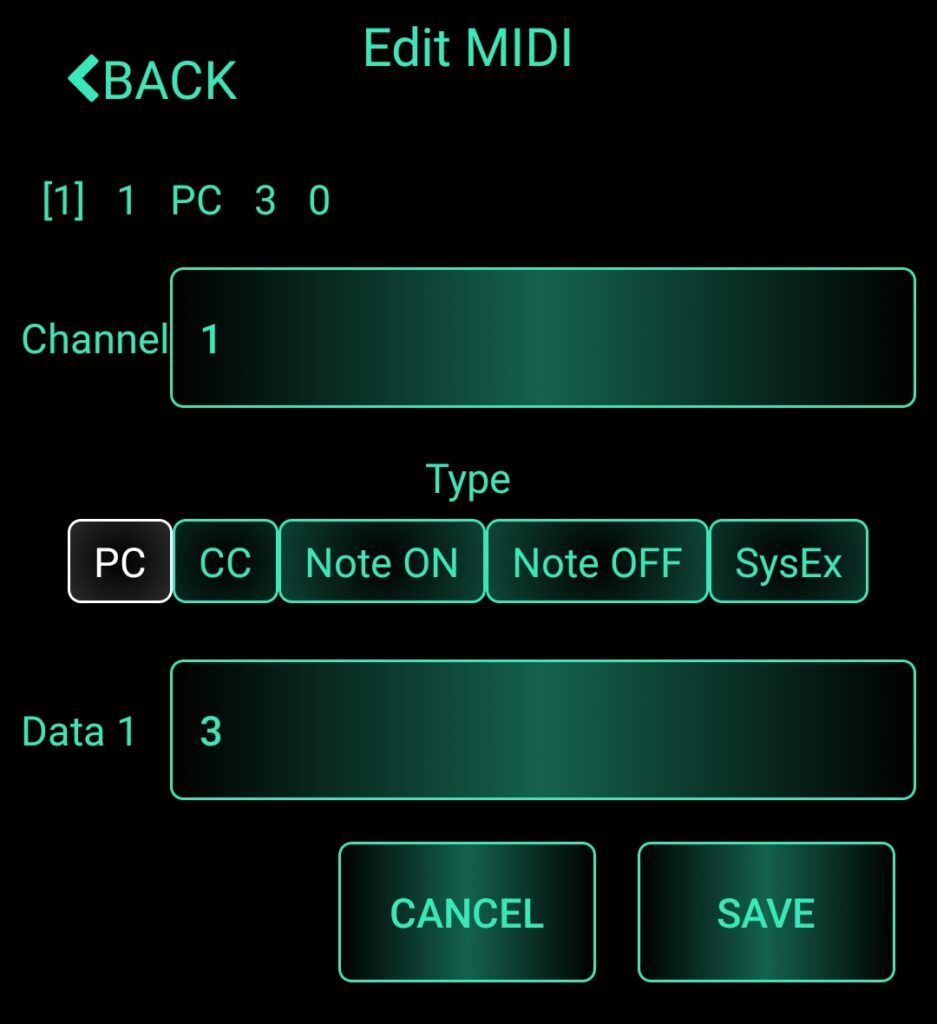
In Group 1, we will configure switches A, B, and C to switch the Stratus between its three primary operating modes.
- Select Group: Set ”Current Group” to 1.
- Switch Mode: Tap Foot Switch [A] and set the mode to ”Single Step.” In this mode, MIDI data is sent immediately upon release and is minimalistic to set up.
- MIDI Parameters: Enter the following values:
- Channel: 1
- Type: CC (Control Change)
- Data 1 (Control Number): 18 (Stratus Mode Control)
- Data 2 (Value): 0 (Looper Mode)
- Save: Tap ”Save” to commit the settings for Switch A.
Assigning Switches B, C & D
Repeat the steps above for the next two switches, changing only the Data 2 value:
- Switch B: Set Data 2 to 1 (Stompbox Mode)
- Switch C: Set Data 2 to 2 (Preset Mode)
- Switch D: Set Data 2 to 3 (Tuner mode)
Once saved, pressing A, B, C or D on your FCP will instantly change the mode on your Stratus!
Group 3: Stompbox mode
- Select Group: Set ”Current Group” to 3.
- Follow the same ”Single Step” procedure used in Group 1, but use 16 (Effect Toggle) for Data 1.
- Data 2: See the list below for values
- Switch A value 0 (toggle 1. pedal)
- Switch B value 1 (toggle 2. pedal)
- Switch C value 2 (toggle 3. pedal)
- Switch D value 3 (toggle 4. pedal)

Group 2: Looper Control
For the Looper, timing is everything. Using ”Single Step” is not recommended here because it sends the signal when you lift your foot, causing a slight delay. Instead, we will use ”Press down – release” mode to ensure the command triggers the exact millisecond you step on the switch.
Programming Switches A, B, and C (The ”Instant” Commands)
- Select Group: Set ”Current Group” to 2.
- Switch Mode: Select ”Press down – release”. This mode allows you to define separate actions for the press and the release.
- Configure Bank A (Press Down):
- Channel: 1 | Type: CC | Data 1: 17 (Looper Control)
- Data 2: See the list below for values
- A value 1 (Record)
- B value 2 (Play)
- C value 3 (Overdub)
- Configure Bank B (Release): Leave this empty. We do not want to send any data when you lift your foot.
Programming Switch D (Dual Function)
To maximize our fourth button, we will use the ”Step short or step long” mode to give it two separate functions.
- Switch Mode: Select ”Step short or step long”.
- Bank A (Short Press): Set Data 1 to 17 and Data 2 to 4 (Pause).
- Bank B (Long Press): Set Data 1 to 17 and Data 2 to 0 (Clear).
Your Looper Group is now complete! You can now record, play, and overdub with perfect timing, and use Switch D to pause or clear your loops.
Group 4: Preset Selection
In Group 4, we will configure the switches to change between your saved Stratus presets. For this, we move away from CC messages and use PC (Program Change) messages.
Group 4: Preset Selection
In Group 4, we will configure the switches to change between your saved Stratus presets. For this, we move away from CC messages and use PC (Program Change) messages.
- Select Group: Set ”Current Group” to 4.
- Switch Mode: Select ”Single step” for all switches (A, B, C, and D).
- MIDI Parameters: Enter the following values for each switch:
- Channel: 1
- Type: PC (Program Change)
- Data 1: See the list below for values
- A value 0 (1. preset)
- B value 1 (2. preset)
- C value 2 (3. preset)
- D value 3 (4. preset)
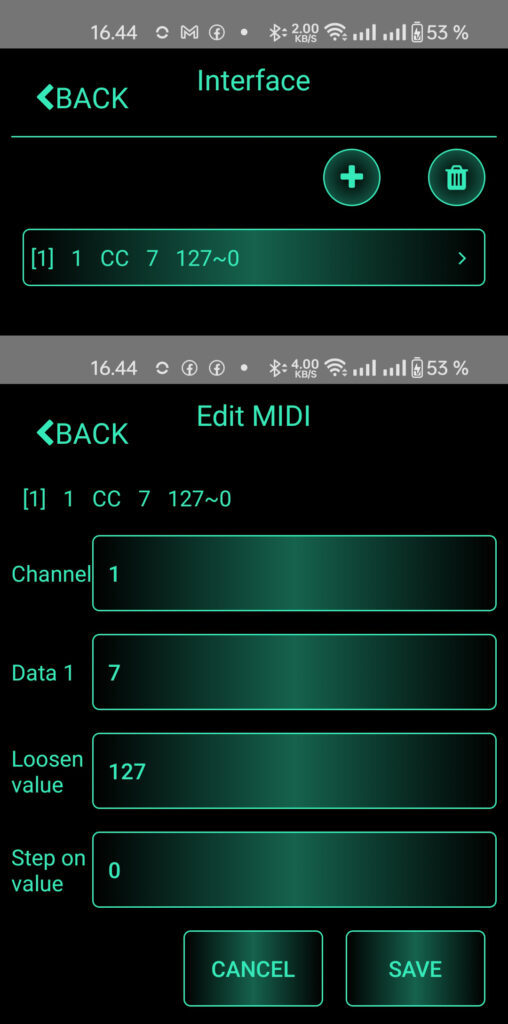
Group 5: Volume Control
There are two ways to manage your volume with the FCP: using the switches for fixed ”jumps” or using an external expression pedal for smooth control.
Option 1: Using Switches (Fixed Volumes)
- Select Group: Set ”Current Group” to 5.
- Switch Mode: Select ”Single step” for all switches.
- MIDI Parameters:
- Channel: 1 | Type: CC | Data 1: 7 (Volume)
- Data 2: Enter the values below:
- A value 0 (Mute)
- B value 19 (15% volume)
- C value 82 (65% volume)
- D value 127 (100% full volume)
Option 2: Using an Expression Pedal (Linear Control)
If you have an expression pedal connected to the FCP’s PEDAL port, you don’t need a dedicated group.
- Open Expression Settings: Tap the Expression Pedal icon on the CubeSuite main screen.
- MIDI Parameters:
- Channel: 1
- Data 1: 7 (Volume Control)
- Set Range:
- Loosen (Heel Down): 0
- Step on (Toe Down): 127
- Save: Tap ”Save” and test the sweep.
Pro Tip: If you prefer the volume to increase when you pull your foot back (Heel Down = Full Volume), simply swap the values: set Loosen to 127 and Step on to 0.
Congratulations! You have successfully integrated the M-Vave Chocolate Plus with the Chaos Audio Stratus.
Quick Verification Checklist
Before you head to the stage or studio, run through this quick ”pre-flight” check:
- [ ] Physical Switch: Is the FCP set to ”H” (Host Mode)?
- [ ] Connection: Are you using a USB Data Cable between the FCP Host port and the Stratus?
- [ ] MIDI Channel: Is the Stratus internal setting still set to Channel 1?
- [ ] Bank Sync: Does the number on the FCP display (01–05) match the Group functions you intend to use?
- [ ] Mode Match: Remember—Looper commands (Group 2) only work when the Stratus is in Looper Mode, and Stompbox commands (Group 3) only work in Stompbox Mode.
Group Reference Map
| Group | Mode / Function | Main Buttons (A-D) |
| 01 | Mode Select | A Looper, B Stompbox, C Preset |
| 02 | Looper | A Record, B Play, C Overdub, D Pause/Clear |
| 03 | Stompboxes | Toggle Pedals 1, 2, 3, and 4 |
| 04 | Presets | Load Presets 1, 2, 3, and 4 |
| 05 | Volume | Mute, 15%, 65%, 100% |
Enjoy!


3 Comments
Add Yours →Dima, this is amazing! Thank you so much for putting together this incredibly detailed and helpful guide. This is going to be a major benefit to several users that have already asked about how to get the Chocolate Plus talking to their Stratus. 🙌😄
I have already tried all of the steps numerous times. Programming the Chocolate Plus is not the issue. It never communicates with the Stratus. I’ve tried several good cables and the Chocolate Plus is powered using USB with the 2nd cable going to Host -> Stratus. I know my Chocolate Plus works in page turner mode with my tablet and also when programmed to control my Line 6 Catalyst via BT Midi adapter. Just cannot get the Stratus to work with it.
Have you check that Stratus has newest firmware? I didn’t get midi to work with older Stratus’ firmware.
Have you check that both Stratus and Chocolate’s use same midi channel?